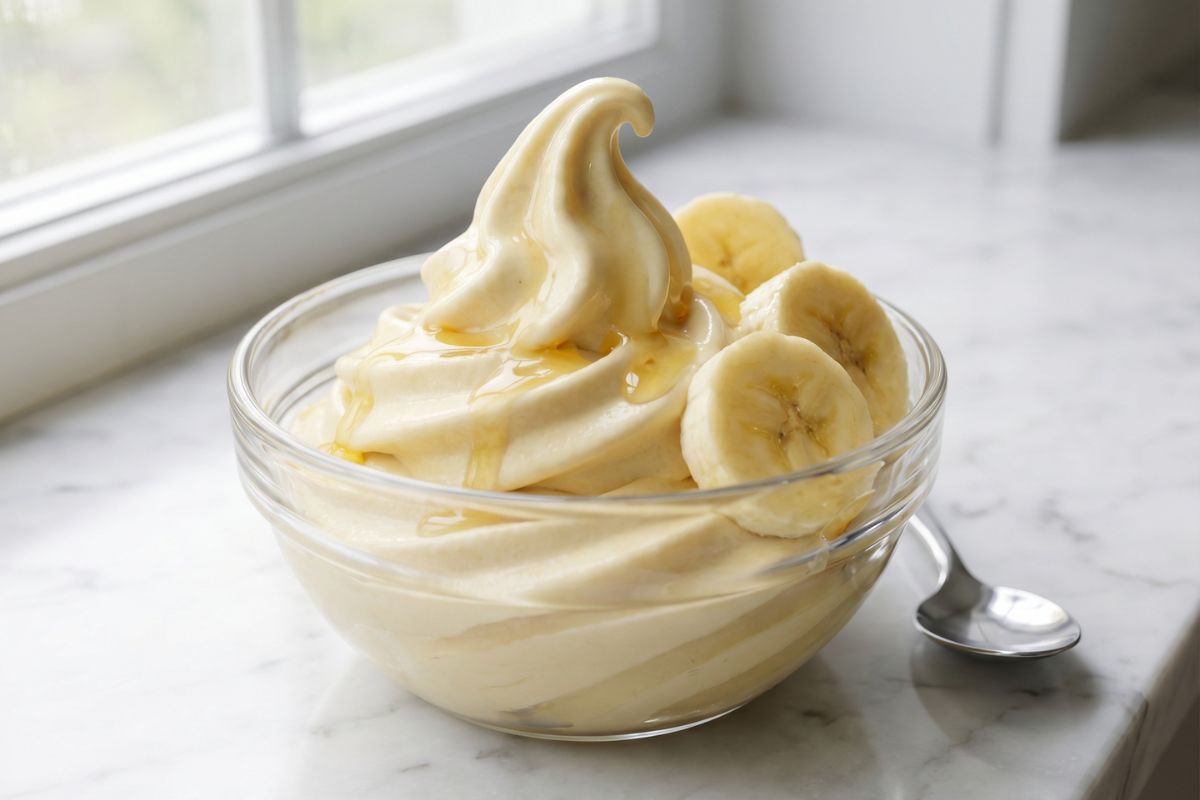
If you want a healthy dessert, try this Ninja Creami Banana Ice Cream Recipe today. It is creamy, sweet and very easy to make. You only need a few simple ingredients and a machine.
This recipe is perfect for hot days or quick cravings. In this guide, you will learn How to make Ninja Creami Banana Ice Cream step by step.
It tastes like soft serve and feels very smooth. Let’s make this easy frozen treat at home.
My Experience With This Recipe
I love simple desserts that need less effort. This banana ice cream quickly became my favorite. I tried it first using my Ninja Creami machine. The result was rich and creamy.
The natural sweetness of bananas makes it special. I did not need much sugar. My family enjoyed it a lot. Even kids loved this healthy treat. Now, I make it every week in summer.
Recipe Card Info
- Recipe Name: Ninja Creami Banana Ice Cream Recipe
- Servings: 2
- Prep Time: 10 mins
- Cook Time: 0 mins
- Total Time: 10 mins (+ freezing time)
- Course: Dessert
- Cuisine: American
- Calories: 180 kcal per serving

Equipment List
- Ninja Creami machine
- Freezer-safe container
- Blender or fork
- Spoon
- Knife
- Cutting board
Ingredients You Need for Ninja Creami Banana Ice Cream Recipe
- 3 ripe bananas (sliced)
- 1/4 cup milk (any type)
- 1 tablespoon honey or maple syrup
- 1/2 teaspoon vanilla extract
- Pinch of salt
Optional add-ins:
- Chocolate chips
- Peanut butter
- Nuts
- Caramel sauce
Instructions
1. Prepare the Bananas
Peel the bananas and cut them into small slices. Place them in a freezer-safe container. Spread evenly so they freeze faster and blend smoothly later.
2. Freeze the Bananas
Place the container in the freezer for at least 8 hours. Make sure bananas are fully frozen. This step is important for creamy texture.
3. Blend the Base
Take frozen bananas and add them to a blender. Add milk, honey, vanilla extract and salt. Blend until the mixture becomes thick and smooth.
4. Transfer to Container
Pour the blended mixture into the Ninja Creami container. Smooth the top using a spoon. Place it back in the freezer for about 2 hours.
5. Process in Ninja Creami
Insert the frozen container into the Ninja Creami machine. Select the “Ice Cream” function. Let it process until creamy and soft.
6. Re-spin if Needed
If the texture looks crumbly, use the “Re-spin” option. This step makes the ice cream smoother and more creamy.
7. Add Mix-ins
If you want extra flavor, add chocolate chips or nuts. Use the “Mix-in” setting to blend them evenly into the ice cream.
8. Serve Immediately
Scoop the banana ice cream into bowls. Serve fresh for the best taste. Enjoy the creamy texture and natural sweetness.
Recipe Tips
- Use very ripe bananas for better sweetness.
- Freeze bananas properly for smooth texture.
- Add more milk if mixture feels too thick.
- Do not skip re-spin for creamy results.
- Try different flavors like cocoa or berries.
- Use chilled container for best results.
Nutrition Information
| Nutrient | Amount per Serving |
|---|---|
| Calories | 180 kcal |
| Carbohydrates | 30 g |
| Sugar | 18 g |
| Protein | 3 g |
| Fat | 3 g |
| Fiber | 3 g |
Serving Suggestions
This Ninja Creami Banana Ice Cream Recipe tastes amazing when served fresh. You can top it with chocolate syrup or crushed nuts. I also like adding fresh banana slices on top.
It works great as a light dessert after dinner. You can even enjoy it as a healthy snack. The creamy texture makes it feel like real ice cream, but lighter.
Best Sides To Serve With
You can enjoy this banana ice cream with many sides. Try serving it with cookies for a sweet combo. Pancakes also go well with it.
You can pair it with waffles for a fun breakfast dessert. Fresh fruits like strawberries or mango add more flavor. These sides make your dessert more exciting.
Storage and Reheating Tips
Store leftover ice cream in the freezer in a sealed container. It stays good for up to one week. Before eating again, let it sit at room temperature for a few minutes.
You can also re-spin it in the Ninja Creami machine. Do not microwave, as it will melt quickly and lose texture.
Ninja Creami Banana Ice Cream Recipe
Ingredients
- 3 ripe bananas sliced
- 1/4 cup milk any type
- 1 tablespoon honey or maple syrup
- 1/2 teaspoon vanilla extract
- Pinch of salt
Optional add-ins:
- Chocolate chips
- Peanut butter
- Nuts
- Caramel sauce
Instructions
Prepare the Bananas
- Peel the bananas and cut them into small slices. Place them in a freezer-safe container. Spread evenly so they freeze faster and blend smoothly later.
Freeze the Bananas
- Place the container in the freezer for at least 8 hours. Make sure bananas are fully frozen. This step is important for creamy texture.
Blend the Base
- Take frozen bananas and add them to a blender. Add milk, honey, vanilla extract and salt. Blend until the mixture becomes thick and smooth.
Transfer to Container
- Pour the blended mixture into the Ninja Creami container. Smooth the top using a spoon. Place it back in the freezer for about 2 hours.
Process in Ninja Creami
- Insert the frozen container into the Ninja Creami machine. Select the “Ice Cream” function. Let it process until creamy and soft.
Re-spin if Needed
- If the texture looks crumbly, use the “Re-spin” option. This step makes the ice cream smoother and more creamy.
Add Mix-ins
- If you want extra flavor, add chocolate chips or nuts. Use the “Mix-in” setting to blend them evenly into the ice cream.
Serve Immediately
- Scoop the banana ice cream into bowls. Serve fresh for the best taste. Enjoy the creamy texture and natural sweetness.
Notes
- Use very ripe bananas for better sweetness.
- Freeze bananas properly for smooth texture.
- Add more milk if mixture feels too thick.
- Do not skip re-spin for creamy results.
- Try different flavors like cocoa or berries.
- Use chilled container for best results.
FAQs about Ninja Creami Banana Ice Cream Recipe
1. Can I make this recipe without a Ninja Creami?
Yes, you can. Blend frozen bananas until smooth using a strong blender. It will still be creamy, but the texture may not be as soft.
2. Why is my ice cream crumbly?
This happens when the mixture is too dry. Use the re-spin function or add a little milk. This will help make it smooth and creamy again.
3. Can I use frozen bananas directly without blending first?
It is better to blend first for even texture. The Ninja Creami works best when the mixture is smooth before freezing again.
4. Can I make this dairy-free?
Yes, you can use almond milk or coconut milk. The result will still be creamy and tasty. It is a great option for dairy-free diets.
5. How can I make it more sweet?
Use extra honey or maple syrup. You can also add dates or flavored syrups. Always taste the mixture before freezing.
Conclusion
This Ninja Creami Banana Ice Cream Recipe is simple, healthy and delicious. It uses natural ingredients and takes very little effort.
Now you know How to make Ninja Creami Banana Ice Cream at home easily. Try this recipe today and enjoy a creamy frozen treat.
It is perfect for kids and adults. You can also create new flavors by adding your favorite toppings. Enjoy every bite of this easy homemade dessert.
Sara Collins is a food blogger at TastyDive. She shares simple and family-friendly recipes made with everyday ingredients. Her mission is to help home cooks enjoy tasty meals without stress.